Showing posts with label Home Improvement. Show all posts

Thursday, May 31, 2012

Resurrecting Hub's Childhood

Well, the title may be slightly misleading... this post is more accurately about resurrecting a piece of furniture from Hub's childhood-- His nightstand to be more exact.


This is a nightstand that stood beside Hub's bed since he was a wee little boy.  I can just imagine him hiding a slingshot in it's drawer, so his mom couldn't find it.  Or maybe when he was five he stashed his pet worm in there or maybe a secret store of candy... or... or...


A year ago, Hub's mom offered me his old nightstand.  Since our wedding day, it had been taking up space in their storage room.  Hub's mom made it clear that it was time to either (A) send it to Goodwill or (B) relocate it to our house.  Because I am such a nostalgic, sensitive person (insert my sister's snorts here), Hubs and I carried the nightstand down the road and into our abode.


The darn thing looked like it had endured a rough life by the time it made it's way to our house (which lends credit to my belief that it probably housed a worm or two).  The drawer's knob was broken in half, the drawer itself was in pieces, and all of the wood was water-stained and scratched.


After we brought it home, I placed the nightstand just inside our entry because its compact size was a good fit for the space.  I put a tablecloth over it to hide its "beauty" and put a bowl on it to catch keys, poop bags (for dog walks), construction pencils, paint keys, and so on.  Then I proceeded to completely forget about it.

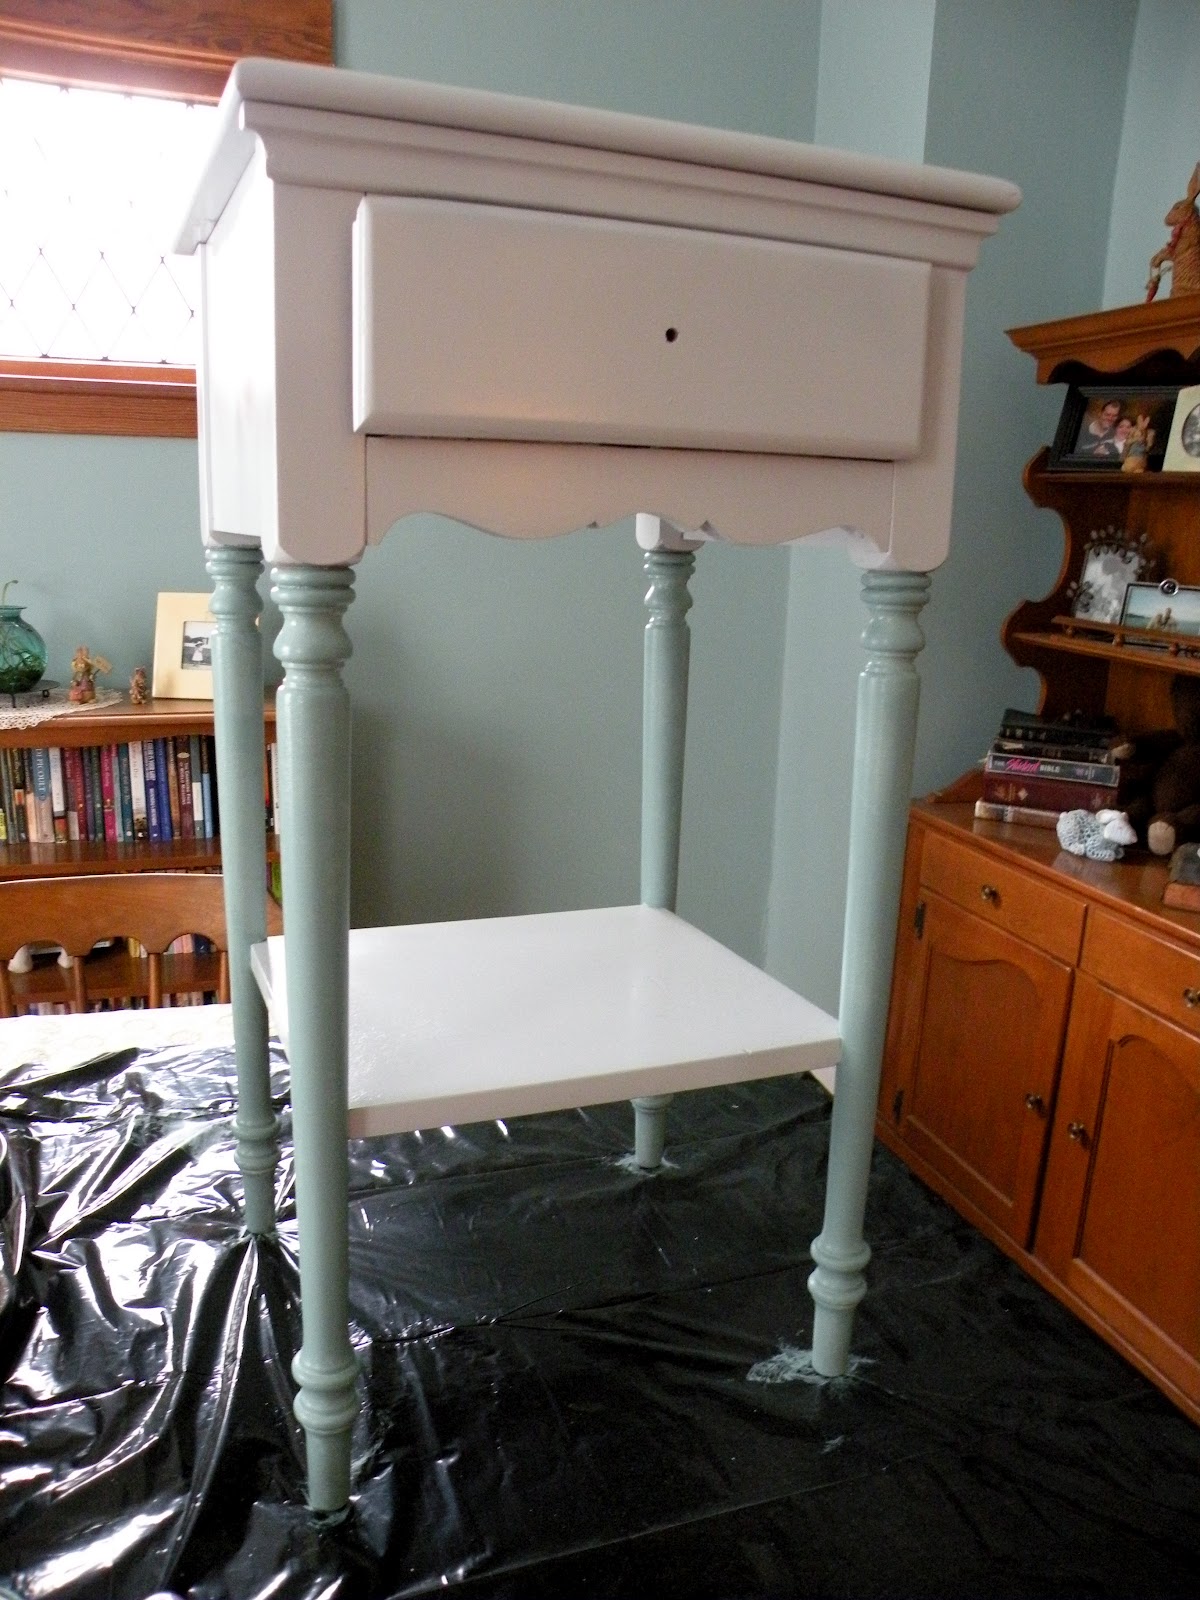
Until a month ago that is...  When I randomly remembered Hub's poor nightstand and committed to giving it new life.  I walked over to the local Ace Hardware and bought two cans of bright white, high gloss spray paint.  I also found a can of "oops" Benjamin Moore paint (discounted paint that was either mixed incorrectly or returned).  "Oops" paint is hit or miss, but I was able to find a light blue/green color that closely resembled the Homestead Green in our dining room and craft room.


When I returned home with my paint, I went about sanding the nightstand with a rough and then a fine sandpaper block.  Sanding was a tedious process, but I knew it was necessary for the best painting results.  I also used wood glue to reassemble the nightstand's drawer and I threw out the old, broken knob.  Adios muchacho.


When the sanding was finished, I carried the nightstand outside and began spraying it.  I would say the spraying was even more tedious than the sanding.  I have no patience... I just wanted it done.  I had to keep reigning myself in--Trying hard to spray light, even coats to prevent dripping.  I ended up doing three light coats to get a good white base.  Even though I knew I wanted to paint the legs with my "oops" paint, I gave them a good coat of white as well to act as primer.


The white base coat made the nightstand look like a completely different piece of furniture... It looked new and fresh, incredibly cheery, and ready for its extra special pop of color.  After drying for three to four hours outside, I carried the nightstand back into the house and used my new Purdy brush to give the legs some color thanks to my can of "oops" paint from Ace Hardware (Purdy brushes are the best).


Adding a new, basic, white knob to the drawer was the last step.  Although the knob was new, I still have my eye on a more antique and quirky knob (read expensive) from Anthropologie.  So I guess you could say the nightstand is still in process, although the main renovation is complete.

For now, the nightstand is once again living in the entry, but it is no longer hidden beneath a tablecloth.  It stands proudly welcoming our guests, offering them a place to stash their keys and miscellaneous items.  I really love how this makeover turned out.  What did Hubs think?  He didn't even recognize his old pal!  But once he realized it was his childhood nightstand- he said, "Wow."  Count on a man to give good feedback.  


Thursday, May 24, 2012

Garden Party

So much has happened and I have been neglectful in sharing.  Sorry about that... I blame the beautiful weather, my (tri) training schedule, and the dogs.  Actually, the dogs have nothing to do with it, but why have them if you can't blame them for ludicrous things like not blogging?


As the title of this post suggests, Hubs and I have been busy planting our garden.  Finally.  Last year, we planted in late April.  This year, our weekends kept filling up before we could set aside time to make a garden plan.  Get it?  There was no time to plan for planning and everyone knows I am a planner.  Geesh.


Anyway, this past Saturday we finally said- enough is enough.  We sat down at the dining room table and pulled out our planting list from last year (our first year with a garden).  Last year we planted:

Carrots (finger-long), broccoli (which didn't produce), white onions, green onions, zucchini (another dud), cucumber, red peppers, green peppers, cherry tomatoes, beefsteak tomatoes, bibb lettuce, and red lettuce.

Last year
Right away we knew we wanted to eliminate the green onions and broccoli because we rarely used them.  We also knew that we wanted to plant the zucchini from a live plant this year because last year the seeds produced only failure.  In addition, we knew that we didn't want to plant lettuce this time around because we didn't need to-- The bibb lettuce from last year came back on its own and has been producing like a champ.

From there, we drew up plans to add some new produce to the mix.  Unfortunately, when our list of  wants was complete, we realized we didn't have enough space to plant everything.  We considered container gardening on the deck in addition to using our two raised beds, but Hubs had a winning idea-- Add on to our existing raised beds... or more accurately, connect them and fill in the space in between.

See the space in between the two beds?  Well, it's not there anymore!
Due to the nature of our existing beds, adding on turned out to be simple.  We headed over to Menards and purchased a 1"x4"x10' board.  We took the board home, cut it into four 2' long pieces (with a little length leftover for cut lines and boo-boos).  Each board was then slid into the grooves on our existing raised bed corner posts.  Presto change-o!  A revised, much more awesome, larger garden bed.   Breakdown: we used to have two 4'x4' garden beds.  We now have one 4'x10' garden bed. 

Here's what we planted:

Cucumbers (tzatziki here I come), zucchini (using live plants), summer squash, finger-long carrots, two strawberry plants, white onions, red onions, cilantro, basil, rosemary, parsley, oregano, cherry tomatoes, roma tomatoes, jalapeno peppers, serrano peppers, and the bibb lettuce (which just came back all on its own).


In addition to this, I also planted 60 gladiola bulbs in the flower beds surrounding the house, two new rosebushes in a corner of the backyard, two new blueberry bushes to aid the one that was planted last fall, and four fern plants to beautify the front porch (in hanging baskets).

It was a busy weekend, but wait until you hear what happened the weekend before.  We'll just backtrack until we're caught up and then I'll fill you in on my preparation for the sprint triathlon, which is coming up on June 10th.  So much to be excited about... I can just feel your anticipation mounting.


Saturday, April 28, 2012

We're making our own Dirt

Last weekend, Hubs got super ambitious and decided to tackle the woodpile behind our garage.  The woodpile was another "out of sight, out of mind" kind of situation.


Looking for Easter eggs in the woodpile shortly after we moved in to our house.
The pile got its beginnings way back when we bought our house and began our construction projects inside.  Whenever we had 2x4 scraps or unused shims, we tossed them out behind the garage.  Then, when we initially cleared the yard of all its brush and tore down the greenhouse, the pile climbed even higher.  And it just kept growing... It nearly doubled in size when Mom tore down the ramshackle fence while Dad and Hubs worked on the roof last fall.

And here comes the fence...
The woodpile was a true eyesore, not like the beautiful stacked log piles you see Up North nestled beside a gorgeous log cabin.  It was more like an ugly beaver dam; sticks and boards thrown together every which way.  And not only was the pile ugly, but it was dangerous for humans and canines because most of the boards were filled with rusty nails.  Hubs and I were always having to call the dogs away from the woodpile, where they liked to scavenge for chewing sticks.  Praise God they never got a nail in the paw or muzzle.


So anyway, Hubs woke up last Saturday morning and announced that he was going to light up the fire pit and burn some of the wood.  I was elated.  By the time I ventured outside after lunch, a good bit of the pile had already been broken down and a fair portion was burned.

I was happy enough with the burning of the brush, but then Hubs announced that he wanted to use the old fence boards to build my (longed-for) compost bin.  A year ago, I had picked out a cedar compost bin on Plow & Hearth.  The cedar compost bin cost $149.95.  I was waiting for the right time to convince Hubs that we should make the investment.  I never imagined he would build me a custom bin.  Hooray!

Together, we picked out the ideal location--Right behind our garage where the woodpile had already destroyed the grass.  Perfectly ironic.  Having it behind the garage would not only prevent us from ruining anymore grass, but it would be hidden from the patio... and hopefully out of smell range (just in case).


After scouting out the location, we decided on the design.  I knew the compost bin had to be secure from the dogs and other visiting creatures, so it would need to have four complete sides and a lid while still allowing for air circulation and the occasional tossing.  Judson's close call with coffee grounds a couple years ago cemented the need for a tamper proof container.

Other than that, we didn't do too much planning.  We just agreed on our basic needs and came up with a rudimentary design before getting started.  There were no mock ups or drawings involved.  We said, "Let's shoot for this" and then Hubs got started.


For the general lack of planning that happened, I am extremely satisfied with the results.  Hubs built a 4ftx4ft bin with a pallet-like floor.  We put pea gravel underneath the bin and then lined the inside of three walls and the floor with chicken wire... to keep the compost in and the dogs/critters out.  The fourth wall (facing the yard) was made with removable boards held on by brackets.  The removable boards will allow us to easily mix the compost and then to remove the soil when it's ready for the gardens.


The bin's lid has yet to be built, but we have another rudimentary design for it when the time comes.  Meanwhile, we had a celebratory ceremony where Hubs and I each threw a handful of grass clippings into the compost bin.  Then yesterday, Hubs took out my first bowl of food scraps from the kitchen.  I feel very Rachel Ray, having a food scrap bowl on my counter.  E.V.O.O. anyone?


Oh... and the woodpile is now down to just a few more fence boards (some of which will be used for the bin's lid), some thicker logs and smaller kindling.  What isn't used for the lid will eventually find its way to our fire pit.  I envision lovely summer nights of sitting around the fire with my Hubs,  the compost bin in my peripheral vision-- composting away my food scraps into nutrient rich soil for our blossoming garden.


Up next (after the lid gets built), an up-cycled rain barrel.  Stay tuned, Casa Case is going green!

Friday, April 27, 2012

Check it off the List

A few weeks ago my parents came to town and while they were here, they helped us repair our master bedroom closet window.  Hallelujah.

That particular window needed to be replaced badly; it was sporting a huge crack across the panes.  As a temporary patch, we covered the window with plastic and a thick curtain.  Even so, it was a major energy suck (in the winter I could feel the money rushing out of our pockets whenever we opened the closet door and cold air rushed into the bedroom).

So what took us so long?  Well, let's see...

  • It was out-of-sight, out-of-mind (probably the main culprit).  
  • We weren't exactly sure how to go about measuring for a new window.
  • The project would require emptying the completely packed closet.
  • We needed nice (at least not rainy or snowy) weather.
  • Procrastination (okay, so this may be the real main culprit). 

Check out the progress:

Removing the trim from around the old window (note the Ham radio decals left by the former owner)

In all honesty, this was a pretty cool, old window...

I mean, look at this old handle--Awesome

Here's Hubs installing our new window (which we bought at Menards)

Ladder climbin'

Trim figurin'

 Supervisor Judson

Here's Hubs and his portable air compressor... What a cutie (Hubs, not the compressor)
Having the new window installed has made a noticeable (read- massive) difference in the master bedroom's temperature.  Thank you, Mom and Dad, for coming down and making sure we got the job done... and done correctly.  You are a blessing to us!

Tuesday, March 13, 2012

Beautiful Weather

The weather has been unbelievable. I am talking 70 degree weather in March-- This may be commonplace down south, but I don't live in the South.  I live in the normally icy Midwest. I didn't even have to wear a coat today. Tomorrow, I'm planning on running laps out on the track during my lunch break (yes, I'm that girl now).

There's no doubt, this beautiful weather has me spending a lot more time outside. On Sunday, Hubs and I spent hours working in the backyard. The poor thing was in pitiful shape (the yard, not Hubs). For starters, there were little doggy "gifts" all over the lawn.  And where there was no dukey, there were sticks and leaves.

First line of defense--Hubs took up the rake and gave the whole yard a once over. I followed along behind him with my purple lawn gloves on.  I believe we filled five yard bags.

Once the grass was raked and cleared, Hubs spread grass seed and I uncovered my tulips and roses (already budding).  I also checked on the two lilac bushes we planted last fall; I was worried they weren't going to make it. I was excited to see that they are beginning to bud as well.  Hopefully, we will have fragrant lilacs greeting guests as they approach our home this summer.

Spring is in the air and it doesn't even officially start until next week.
Here's a perfect example of how bad the grass is in the back, but not for long (we hope).
Now that the yard is cleared, Hubs and I have big plans for the back. We want to keep babying the grass because there are currently several bald spots-- From the dogs, the removed greenhouse/sidewalk, and just the general lack of care the yard obviously went through before we arrived on the scene. We also want to tear out our wood deck and retaining wall. We want to replace the wood with flagstone, which should make the backyard look more clean and bright. We also want to move the fence next to the driveway, so that it is aligned with the house and not jutting out into the driveway like it is now.  Lastly (and this really isn't in the back, but more to the side of the house), we want to resurface our driveway; it's pretty shabby.

No matter how gross the grass is--Judson is always happy to be outside.

And Grace just wants to run. She's our sporty girl.
There is definitely a lot of work to be done, but we are determined to tackle as much as we can.  It will be a busy spring and summer.  Also, I have Hubs word that we will finish our master bedroom by May (and his fingers weren't crossed behind his back- I checked).


Sunday, October 2, 2011

Porch Progress

This past week was rainy and cold, so imagine my surprise when the sun came out on Saturday.  It turned out to be a gorgeous day and for some reason, I was totally wired.  I mean it-- I did two loads of laundry, washed a bunch of dishes, vacuumed the house, cleaned out our work van, and then I tackled a long overdue porch project.

Way back when we first bought our house, the porch looked like this:

Here's my sister, but if you look past her you can see the worn porch boards.

The porch was a real eye sore.  The floor boards were worn and had the remnants of old brown paint splattered on them.  The steps were definitely showing their age, warped and ugly.  Perhaps the worst thing about the porch though, was that someone, sometime, painted the cement walls two different colors and neither of them even closely resembled a natural cement color.  Yuck.

From the day we moved in, fixing up the porch was on our long to-do list.  It just wasn't at the top--I'd say it fell somewhere more in the middle.  Well, I guess we've reached the middle of the list now because the porch has really been irking me this summer.  I kept telling Hubs I wanted to do something about it and he would nod and remind me of all the other projects that need to get done.

Even so, Hubs did agree to switch out the steps for me a couple weeks ago.  We were wandering around Menards and came across a good deal on lumber. Here we are making the switch-a-roo:

He's hot stuff!

{Total side note- Hubs did this manicure for me.  He's amazing, huh?}


After we got the stairs replaced, I decided to let Hubs off the hook for a few weeks before I started hassling him about painting again (I'm so nice).  But before I could say anything--He brought the floor grinder to the house and did all the prep on the floor!  What an amazing surprise.... and the reason why I was able to prime everything on Saturday.

What's up next?  Stay tuned for the final floor/stair color- it's bold, but beautiful!


The sanded porch boards


Thursday, September 15, 2011

Unexpected Improvements

Now that the Fair is over, I can catch you up on some home improvements that took place over Labor Day weekend.  As I already mentioned, Mom and Dad ended up coming down for a visit.  Or should I say, they came down to kick our butts into motion.

Back in the beginning of August we had a terrible storm blow through our area. The wind was blowing like a banshee and the rain was coming down sideways-- It was one of those storms. The house managed to escape unscathed, but the garage roof wasn't so lucky.  A large branch fell on the front section, right above the doors, breaking through the eave.  The wood was pretty weak already, making the damage worse than it would have been otherwise.  Even so, we had no immediate plans to replace it.  Or so we thought...

With the roof damaged, the garage was looking pitiful indeed.  In July, Hubs and I scraped the whole structure. Until Labor Day weekend though, all I had managed to get primed were the walls.  Isn't it crazy that I am married to the world's greatest house painter and yet, it's taking three months to get my garage freshly painted? I'm just saying... The blotchy, messy paint job coupled with some missing window panes/glass in the doors and then the damaged roof had our property looking awful!

I guess my parents couldn't handle my complaining any longer because they jumped in their Tahoe and headed south to help.  And when my parents come with a purpose, they don't dally (especially my mom).  We were up extra early on Saturday morning to drive over to Menards to pick up the shingles and nails. 

Hubs and Dad spent most of their time up on the roof, while Mom and I kept our feet planted firmly on the ground. We focused on painting the garage walls and surprisingly... on taking down the rest of our old fence (between the garage and the back wall).  Now that there isn't a pitbull on the other side, we were eager to shed that eyesore.  Eventually, we'll replace the old fence with new like we did on the other side, but for now-- it just looks so much better.

Enjoy the pics!


How awful!

Getting better...


Hooray!  The old ugly fence is gone.

Thanks for the help, Mom & Dad.